1 Introduction
Internet of Things and Arduino (YouTube) + PowerPoint (PDF)
Cloud services and IoT solutions are becoming increasingly popular. Even the industry embrace IoT as Industrial Internet of Things (IIoT), which is part of the next generation Automation Systems. We will use Arduino. Arduino is popular to use in different IoT applications.
Topics: Internet of Things (IoT), Microcontrollers (Arduino), PWM, Automation, ThingSpeak (IoT Cloud Service), and Cyber Security.

You may go through some of the resources (tutorials, videos, examples, exercises, etc.) below or you may start directly on the final delivery. Then you can use these resources if you need help solving some of the different tasks within the delivery.
1.1 Hardware
You will need the following IoT hardware and components:
- Arduino UNO or similar (Arduino UNO WiFi is recommended but slightly more expensive)
- Breadboard, wires, resistors, LEDs, Push buttons, etc.
- TMP36, Thermistor 10k, Potentiometer, Light sensor
- DAC, e.g., MCP4911 or MCP4725
- Capacitor, e.g., C=10uF
- Air Heater
- Multimeter
1.2 Software
You will need the following software:
2 Arduino
Arduino is an open-source electronics platform based on easy-to-use hardware and software. Arduino boards are able to read inputs, like light sensors, activating a motor, turning on an LED, etc. A lots of different Arduino boards exists, but Arduino UNO is the most popular Arduino board. Arduino is very popular in IoT projects and applications.
Engineering Essentials
Arduino is a Microcontroller. Arduino has a Bootloader and not an ordinary operating system. Arduino is NOT a computer, only a small microcontroller, whose purpose is to control things. Arduino has no Bluetooth, Wi-Fi (some models have) or Ethernet (but can be provided as so-called Shields). Arduino has very little RAM (a few Kb) and therefore inexpensive. Arduino is excellent for IoT Applications.
Introduction to Arduino (YouTube) + PowerPoint (PDF)
Programming with Arduino (Textbook) (PDF) - If you have no experience with Arduino, you should start to play with the Arduino and do the examples inside this textbook. The textbook is also available in Norwegian: Arduino Programmering (PDF).
Arduino Serial Monitor and Plotter (YouTube) + PowerPoint (PDF)
Are you using the new Arduino UNO R4? - See this Arduino UNO R4 Tutorial (PDF)
For making wiring diagrams Circuit Canvas is recommended. Another alternative is Fritzing. These are software tools for design of electronics hardware and creating circuit diagrams. You can use these tools for designing or documentation of your electrical circuits.
2.1 IoT Sensors
Here is an overview of some selected IoT Sensors:
Arduino and DHT22 Temperature and Humidity Sensor (YouTube) + PowerPoint (PDF)
Arduino and DS18B20 1-Wire Temperature Sensor (YouTube) + PowerPoint (PDF)
Arduino and AM2320 Temperature and Humidity Sensor (YouTube) + PowerPoint (PDF)
2.2 DAC
DAC – Digital to Analog Converter. Arduino UNO has no Analog Output Pins, so we need a DAC such as, e.g., Microchip MCP4911, MCP4725 or similar. MCP4911 is 10-bit single DAC, SPI Interface. The MCP4725 is a little more expensive, but simpler to use. MCP4725 has 12-bit resolution and I2C Interface.
Arduino and DAC (YouTube) + PowerPoint (PDF) - The tutorial uses the MCP4911 with SPI Interface
Note! The analogWrite() function has been renamed to just write().
Do you have an "MCP4725 DAC Breakout Board" from Adafruit or Sparkfun? Take a look at the tutorial Arduino MCP4725 DAC Breakout Board (PDF).
Here is another Arduino DAC Library used:
Using MCP49xx DAC chip in Arduino
SPI Arduino Library: https://www.arduino.cc/en/Reference/SPI
MCP49XX Arduino Library: https://github.com/exscape/electronics/tree/master/Arduino/Libraries
2.3 PWM
The Arduino UNO has no real analog out channels, but some of the digital channels can be used as PWM - Pulse Width Modulation.
You can convert a PWM output to an analog voltage level, producing a true DAC. You need to create a simple low-pass filter made from a resistor and a ceramic capacitor, a so-called RC circuit.
Arduino Pulse Width Modulation (PWM) (PDF)
2.4 Arduino Classes and Libraries
When using Arduino you typically use many existing Arduino Libraries. We will learn how we can create our own Arduino Libraries from Scratch.
Arduino Classes and Libraries (YouTube) + PowerPoint (PDF)
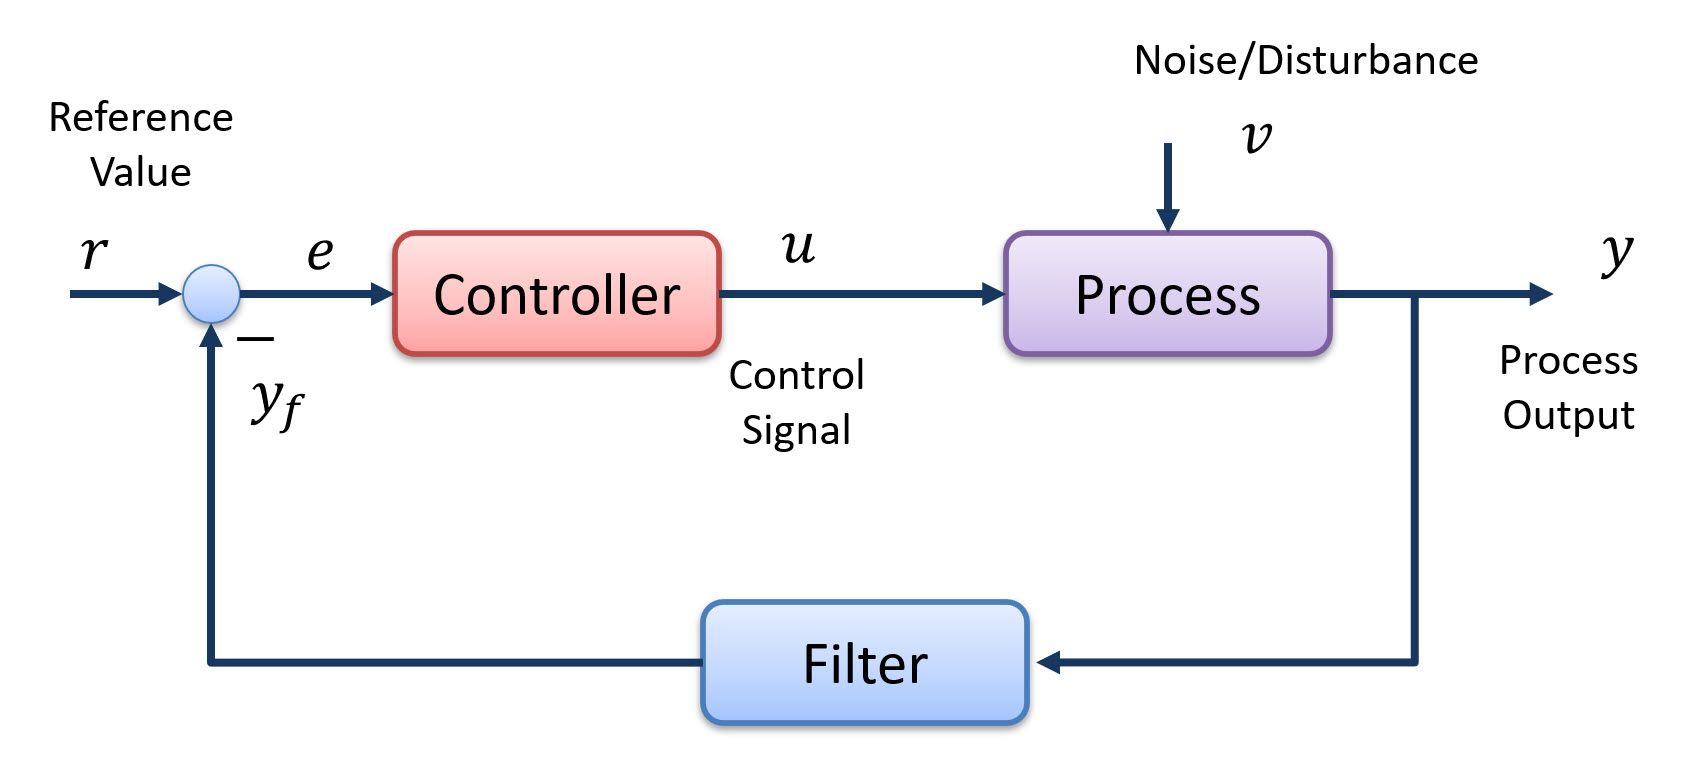
3 Automation
Automation and basic Control Engineering principles are important part of IoT application. Below we see a typical feedback system.
Arduino:
Arduino Control System (YouTube) + PowerPoint (PDF)
Arduino Control Library (YouTube) + PowerPoint (PDF)
LabVIEW:
Simulation and Control in LabVIEW (YouTube) + PowerPoint (PDF) - This Tutorial goes through how to create a basic Control System in LabVIEW using "LabVIEW Control Design and Simulation Module". Note! "LabVIEW Control Design and Simulation Module" is no longer supported in the latest LabVIEW version. You need to use LabVIEW 2022 Q3 or earlier in order to use the "LabVIEW Control Design and Simulation Module". Even if the "LabVIEW Control Design and Simulation Module" is no longer supported, LabVIEW has still built-in PID controllers that you can use ("PID.vi" or "PID Advanced.vi"). An alternative and recommended approach is to make a discrete control system, see below.
Discrete Control Systems in LabVIEW (YouTube) + PowerPoint (PDF) - This Tutorial goes through how to create a basic Discrete Control System in LabVIEW from scratch. Here you find different Simulation Examples in LabVIEW (PDF).
Lowpass Filter:
Implementing Low-pass Filter in LabVIEW (Tutorial)
Lowpass Filter in LabVIEW (YouTube) + PowerPoint (PDF)
Here you find more Control Theory:
Discretization of simulator, filter, and PID controller (Article in MIC Journal) - by Finn Haugen
4 ThingSpeak IoT Cloud Service
ThingSpeak is an IoT cloud service used to store IoT data. ThingSpeak is an IoT analytics platform service that lets you collect and store sensor data in the cloud and develop Internet of Things applications. The ThingSpeak service also lets you perform online analysis and act on your data. Sensor data can be sent to ThingSpeak from any hardware that can communicate using a REST API. ThingSpeak has a REST API that lets you collect and store sensor data in the cloud and develop Internet of Things applications.
Note! Arduino UNO R3 does not have WiFi included. For communication with WiFi and ThingSpeak you need Arduino UNO R4 WiFi, Arduino UNO WiFi R2, Arduino WiFi Shield or a Wifi module like ESP8266.
Resources:
Introduction to ThingSpeak (PDF)
Arduino and ThingSpeak (YouTube) + PowerPoint (PDF)
LabVIEW and ThingSpeak (YouTube) + PowerPoint (PDF)
Are you using the new Arduino UNO R4 WiFi? - See this Arduino UNO R4 WiFi and ThingSpeak Tutorial (PDF).
Note! Arduino and WiFi is not working with Eduroam, so you should setup a location network ("Personal/Mobile Hotspot") using your PC or your Phone. Make sure to use 2.4Ghz network band.
Note! A Free (which we are using) ThingSpeak Channel can only be updated every 15 sec. But it is possible to update uptill 8 fields at the same time (each channel in ThingSpeak can have uptill 8 fields).
Additional Resources:
ThingSpeak - Change Values from a HTML Webpage (PDF)
Arduino Wi-Fi Shield Firmware Update: For those using an Arduino Wi-Fi Shield: A Firmware update may be needed. This web site gives very good instructions how to do this. It takes about 5 minutes to do this.
5 LabVIEW Hobbyist Toolkit
The LabVIEW Hobbyist Toolkit Toolkit adds support for Arduino, Raspberry Pi, and other embedded platforms in LabVIEW. Here you can learn LabVIEW Fundamentals.
Note! The LabVIEW Hobbyist Toolkit has replaced the LabVIEW LINX Toolkit.
THe LabVIEW Hobbyist Toolkit is an add-on for LabVIEW which makes it possible to program these devices using LabVIEW.
LabVIEW Hobbyist Toolkit with Arduino Tutorial (PDF)
You install the LabVIEW Hobbyist Toolkit using the NI Package Manager (included with LabVIEW).
Note! As far as I know, LabVIEW Hobbyist is not so far working with Arduino UNO WiFi Rev2 or the newest Arduino UNO R4 editions. It is only working with the standard Arduino UNO R3.
Videos:
Introduction to LabVIEW Hobbyist and Arduino (YouTube)
LabVIEW Hobbyist Toolkit Arduino DAQ System (YouTube)
LabVIEW Hobbyist Toolkit Arduino Temperature Sensors (YouTube)
Additional LabVIEW Hobbyist Toolkit Resources:
LabVIEW Hobbyist Toolkit, Arduino and ThingSpeak (YouTube) + PowerPoint (PDF)
LabVIEW Hobbyist Toolkit and Arduino using SPI and I2C
(YouTube) + PowerPoint (PDF)
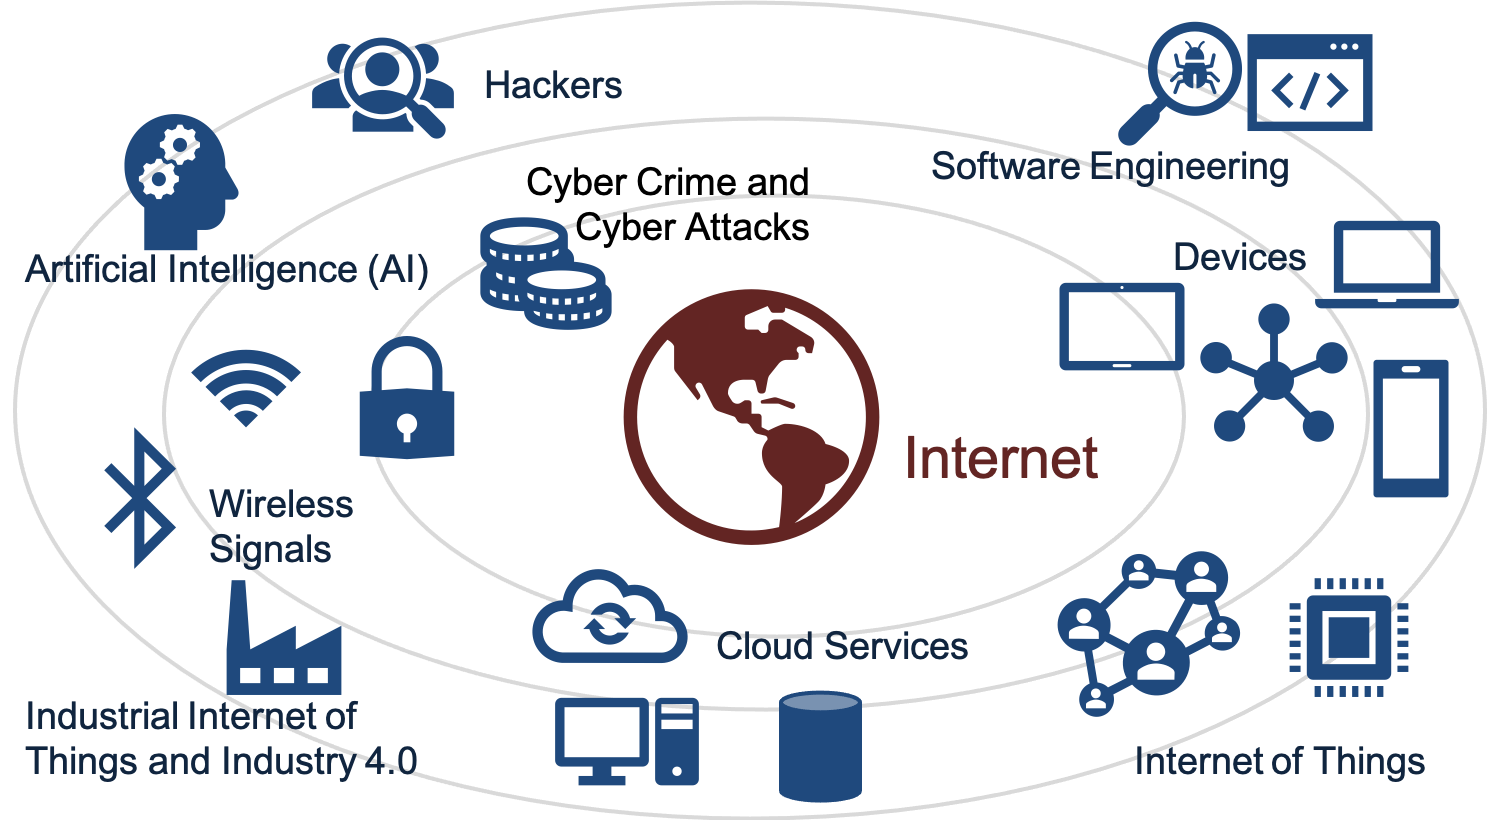
6 Internet of Things and Cyber Security
IoT solutions and Data Security? How can we make sure our applications and data are safe? Security is crucial in IoT/IIoT Applications. Read more about Cyber Security.
Cyber Security Overview (PDF)
Cyber Security (Textbook) (PDF)
Additional Cyber Security Resources:
Cyber Security Tutorial (Website)
Cyber Security Tutorial Library (Website)
Delivery
Introduction
In this Assignment we will create an embedded Arduino PI(D) controller from scratch. One of the challenges is that Arduino UNO has no Analog Out. How can we solve that? The Data should be stored in the Cloud. Here we will use a service called ThingSpeak. The final system should be tested on the Air Heater System. The final system should be able to control the real Air Heater using the a PI controller and where you log data to ThingSpeak.
You should start your work by creating a System sketch. In that way you will get an overview of the system you are going to create. Make System Sketch in PowerPoint (YouTube).
For making wiring diagrams Circuit Canvas is recommended. Another alternative is Fritzing. These are software tools for design of electronics hardware and creating circuit diagrams. You can use these tools for designing or documentation of your electrical circuits.
Note! All parts and tasks (requirements) should finally be put together and presented as one final working system. Pretend you make this for a given customer/client.
A use case for this IoT system is that we often use an embedded system for controlling different local processes like heaters, panel ovens, etc. A microcontroller like Arduino (or similar) is well suited for this since it has built-in I/O and comes in a small size. Such an embedded system typically has no local HMI (except perhaps some physical buttons, LEDs, 7 segment display, etc.), but often a remote HMI that is available over Internet where we can see data, charts and change parameters, etc.
The following Tasks (requirements given by the customer) should be done as part of the delivery:
Part 1: Arduino Control System
- Create a PI(D) controller using the Arduino Software (IDE). We will use the PI controller to control the Air Heater small-scale process. You shall create the PI controller from scratch, i.e., implement a discrete version. Different existing PID libraries exists, but you shall make it from scratch using you knowledge in PID control. It is though recommended that you use one of the existing libraries for getting ideas, comparison and verification to make sure your library works as expected.
- Create a Lowpass Filter to see if we can remove/reduce noise from the measurement signal. Make sure to implement it from scratch. Make sure to test your Lowpass Filter using a TMP36 Temperature Sensor or a Thermistor 10K Temperature Sensor (you should test out both of these). Other IoT Sensors can also be used, e.g., DHT11/22 (Video) or DS18B20 (Video).
- Analog Out: Arduino UNO has no built-in Analog Output Channels. We need Analog Out for the Control Signal (0−5V). We will use a 2 different options (both options should be investigated and compared): Create a hardware RC Lowpass Filter that converts PWM to a smooth voltage signal and/or use a DAC chip/IC (Digital to Analog Converter). Such a chip uses either the SPI bus or the I2C bus.
- Create an Arduino Library for your PID controller and your Lowpass Filter and use that library inside your application. This will be a huge improvement of the code structure and code quality.
- Control the Air Heater Process using your PI Controller and your Lowpass Filter. You should start using a mathematical model of the Air Heater (a simulator) before you test your system on the real Air Heater. For a more easy model, you may set the time delay to 0.
- The Data (the Temperature) should be stored in ThingSpeak. Note! Arduino and WiFi is not working with Eduroam, so you should setup a location network ("Personal/Mobile Hotspot") using your PC or your Phone. Make sure to use 2.4Ghz network band. Now you should also be able to run the Arduino without having it connected to your PC, a socalled embedded system.
- Changing setpoint from hardware? Try out using, e.g., LEDs, Push Buttons, Potentiometers, etc. LEDs can, e.g., be used for showing the value of the PI controller, i.e. the intentisy of the led (LED of if u=0V, max intensity when u=5V). Use, e.g., a green LED, and turn it on when system is on setpoint, etc. Push buttons can be used to configure setpoint, i.e., one Push button for increasing setpoint and another for decreasing setpoint, or you can use a Potentiometer for changing the setpoint value.
- Changing PID parameters from Serial Monitor or Serial Plotter? Are you able to, e.g., set Kp and Ti from the Serial Monitor or the Serial Plotter? You then use Serial.read() in your Arduino code to receive the updated values you enter in either Serial Monitor or the Serial Plotter.
- IoT solutions and Data Security: How can we make sure our applications and data are safe? Security is crucial in IoT/IIoT Applications. Why? Give an overview of issues regarding IoT and Cyber Security in in context of your system. What can be (or what have you) done to protect the system (and data) you have created? How does ThingSpeak handle security?
Part 2: HMI
The Arduino environment does not provide a proper way to include a Human Machine Interface (HMI) or a Graphical User Interface (GUI), except for the Serial Monitor and the Serial Plotter. So, here we will create an HMI/GUI in another environment or programming language like LabVIEW, Visual Studio/C#, Pyton or some web framework.
Typically we want the Arduino to run like an embedded system and have it detached from the computer in the production environment (by removing the USB cable that is attached to the PC and use an external power supply or use a battery package). For this situation we can use an IoT cloud platform like ThingSpeak which has some basic plotting functionality.
Often we want a more sophisticated GUI to be able to change settings like PID parameters and reference value. We also typically want better plotting cababilities than ThingSpeak can provide.
Here are some different alternatives to provide a better HMI/GUI for your system (choose one of these alternatives):
- You can use LabVIEW and the LabVIEW Hobbyist Toolkit. Lots of resources are made for this alternative. With this alternative you create the entire code in LabVIEW, including Control System, GUI and communication with ThingSpeak. The Arduino hardware will only act as a DAQ device or I/O module in this case. So far the LabVIEW Hobbyist Toolkit can only be used with the original Ardiono UNO R3 and not the newest Arduino UNO R4. If you only have Arduino UNO WiFi R2 or Arduino UNO R4, you can wait with this task until you are in the laboratory on campus. You can of course do most of the LabVIEW GUI and code in advance without testing it on the Arduino device (using a "simulated" device). For Analog Out you can use an external DAC or PWM in combination with a RC circuit. With LabVIEW you can also easly communicate with ThingSpeak, see LabVIEW and ThingSpeak (YouTube).
- You can also use LabVIEW using the VISA VIs in LabVIEW (VISA is used for Serial Communication within LabVIEW). This alternative also works with Arduino UNO R4. Example: Serial Communication between Arduino and LabVIEW (YouTube) + PowerPoint (PDF)
- LabVIEW + ThingSpeak. You can make a LabVIEW GUI Application which makes it possible to change the PID controller settings (Kp, Ti, Td, R). This LabVIEW Application updates these values stored in ThingSpeak, then the Arduino program reads and use these values. You can also use LabVIEW for reading Historical data from ThingSpeak and plot them, analyse the data, etc. Here you typically need to deal with data in JSON format, which has become the de facto data format in Internet of Things applications. With this alternative Arduino will run like an embedded control system and you can detach it from your computer where you run the LabVIEW GUI application.
- With MATLAB you can create GUI in addition to great plotting capabilities. You can also use the MATLAB Support Package for Arduino Hardware. No internal resources are made for this alternative, but you will find lots of resources on Internet.
- You can use Python and one of the many available GUI libraries like Tkinter, PyQT, guizero (PDF Tutorial), etc. Few internal resources are made for this alternative, but you will probably find lots of resources on Internet.
- You can create a Desktop Application using Visual Studio and C#. No internal resources are made for this alternative, but you will probably find lots of resources on Internet.
- Make a Webpage which makes it possible to change the PID controller settings (Kp, Ti, Td, R). This website updates these values stored in ThingSpeak, then the Arduino program reads and use these values. Here you see a Webpage Example that updates the setpoint. You may also extend the web page to show historical data from the system. You may use the Web Server (web01.usn.no) available at the University to host the webpage. Here you can use HTML, JavaScript and PHP.
For some of these alternatives the Arduino hardware will only act as a DAQ device or I/O module in this case. The code will then primarly run on your PC and communicate (send/receive data) with the Arduino hardware using serial communication. For other alternatives the Arduino will act as an embedded control system with a remote (wireless) HMI. You can use ThingSpeak as a service to receive and send data between the Arduino device and the remote HMI/GUI.
Make sure to present both parts (part 1 and 2) as one unified system. The final system should be testet both on a simulator and using the real Air Heater.
For a "professional" and robust look, you may put your embedded PID in a box/case and using female banana connectors for easy connection to the real Air Heater process.
Feel free to Explore! Make sure to Add Value and Creativity to your Applications! Try to add some extra value and be creative compared to the simplified examples given by me, in that way you learn so much more.