1 Introduction
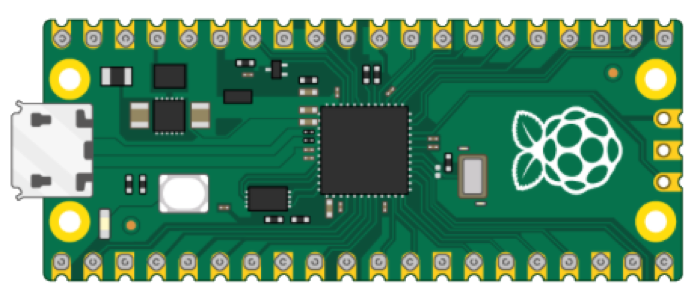
In this Tutorial we are introducing Raspberry Pi Pico. Raspberry Pi Pico is a microcontroller board developed by the Raspberry Pi Foundation. Raspberry Pi Pico has similar features as Arduino devices. Raspberry Pi Pico is typically used for Electronics projects, IoT Applications, etc.
Raspberry Pi Pico + PowerPoint (PDF)
What do you need?
- Raspberry Pi Pico
- A Micro-USB cable
- A PC with Thonny Python Editor (or another Python Editor)
- Breadboard
- Electronics Components like LED, Resistors, Jumper wires, etc.
You can buy Raspberry Pi Pico many places, like Sparkfun, Adafruit, Elfa Distrelec, RS Online, Digi-Key, etc.
1.1 Raspberry Pi Pico
Raspberry Pi Pico is a “downscaled” version of the original Raspberry Pi and is more comparable with Arduino compared to the original Raspberry Pi. You also need to use a downscaled version of Python, called MicroPython.
Raspberry Pi Pico comes in 4 different types:
- Raspberry Pi Pico (original)
- Raspberry Pi Pico H - pre-soldered Header pins included (makes it easy to put the Pico on a breadboard)
- Raspberry Pi Pico W – WiFi included
- Raspberry Pi Pico WH – WiFi and pre-soldered Header pins included (makes it easy to put the Pico on a breadboard)
In this tutorial you can use any of those. Raspberry Pi Pico H or Raspberry Pi Pico WH is recommended unless you want to buy extra header pins and solder them. Here are examples from Digi-Key and Sparkfun.

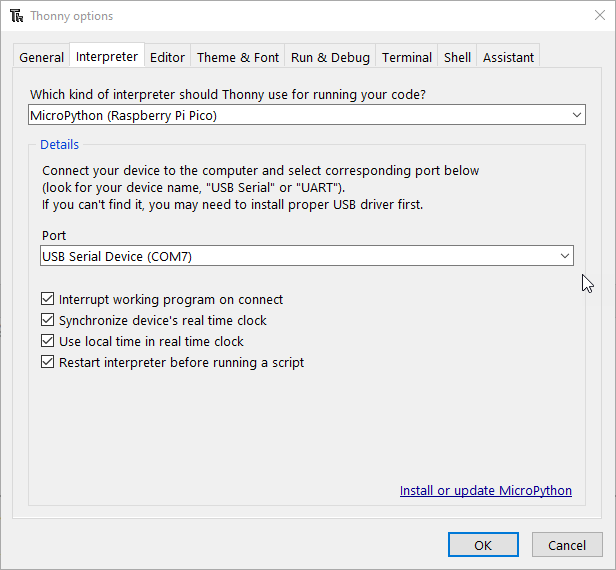
1.2 Thonny Python Editor
Thonny is a simple and user-friendly Python Editor and it is cross-platform working on Windows, macOS and Linux. The Thonny Python Editor has also built-in support for the Raspberry Pi Pico hardware/MicroPython firmware.
And its free.
Webpage: https://thonny.org
1.3 Python/MicroPython
As mentioned, Raspberry Pi Pico uses a downscaled version of Python, called MicroPython, but most of the original Python will work.
Here you find some Tutorials/Videos regarding basic Python Programming:
Introduction to Python (YouTube) + PowerPoint (PDF)
Basic Python Programming (YouTube) + PowerPoint (PDF)
Python Programming (YouTube) + PowerPoint (PDF)
Here you will find more Python Resources.
1.4 Getting Started
The first time you need to install the MicroPython Firmware on your Raspberry Pi Pico. You can install the MicroPython Firmware manually or you can use the Thonny Editor.
Manual Instructions:
- Download the MicroPython UF2 File to your PC: https://micropython.org/download/rp2-pico/rp2-pico-latest.uf2
- Push and hold the BOOTSEL button and plug your Pico into the USB port of your PC.
- Release the BOOTSEL button after your Pico is connected.
- It will mount as a Mass Storage Device called RPI-RP2.
- Drag and Drop the MicroPython UF2 File onto the RPI-RP2 volume. Your Pico will reboot.
- You are now running MicroPython
Using the Thonny Editor:
Select "Tools - > Options.." and select the "Interpreter" tab. Then select MicroPython (Raspberry Pi Pico) and click on the link "Install or update MicroPython" in the lower right corner.
1.5 Code Examples
This tutorial will go through the following code examples:
- Blinking onboard LED
- Blinking external LED
- Pulse Width Modulation (PWM)
- TMP36 Temperature Sensor
These examples will use the GPIO pins that are available on the Raspberry Pi Pico board. Here you see the Raspberry Pi Pico Pinout. In order to use the pins in MicroPython we need to import the machine library in our application:
import machine

2 Blinking onboard LED
The Raspberry Pi Pico board has an onboard LED that we can program/control using MicroPython. The onboard LED is connected to pin 25 on the Raspberry Pi Pico board. Here you see the Raspberry Pi Pico Pinout.
Raspberry Pi Pico - Onboard LED
We initialize the LED like this:
import machine

pin = 25
led = machine.Pin(pin, machine.Pin.OUT)
Note! If you are using Raspberry Pi Pico W instead of the original Raspberry Pi Pico, you need to do as follows:
import machine

pin = "LED"
led = machine.Pin(pin, machine.Pin.OUT)
Because on the Raspberry Pi Pico W pin 25 is used for internal communication with the WiFi chip.
MicroPython Code for turning the onboard LED ON:
import machine

pin = 25
led = machine.Pin(pin, machine.Pin.OUT)
led.value(1)
MicroPython Code for turning the onboard LED OFF:
import machine

pin = 25
led = machine.Pin(pin, machine.Pin.OUT)
led.value(0)
We can also "toggle" the pin ON or OFF:
import machine

pin = 25
led = machine.Pin(pin, machine.Pin.OUT)
led.toggle()
This means if the LED is initially off it becomes on using the toggle() function and vice versa.
We can also toggle the LED on and off using a While loop like this in combination with the sleep() function:
import machine
import time

pin = 25
led = machine.Pin(pin, machine.Pin.OUT)

while True:
    led.value(1)
    time.sleep(2)
    led.value(0)
    time.sleep(2)
Instead of a While Loop you can use the Timer module to set a timer that runs a function at regular intervals:
from machine import Pin, Timer

pin = 25
led = Pin(pin, Pin.OUT)
timer = Timer()

def blink(timer):
    led.toggle()

timer.init(freq=1, mode=Timer.PERIODIC, callback=blink)
Here you will find a video showing the final result.
3. Blinking external LED
Next we will use an external LED that we wire on a Breadboard and connects to the Raspberry Pi Poco board.
Raspberry Pi Pico - external LED
Wiring Diagram:
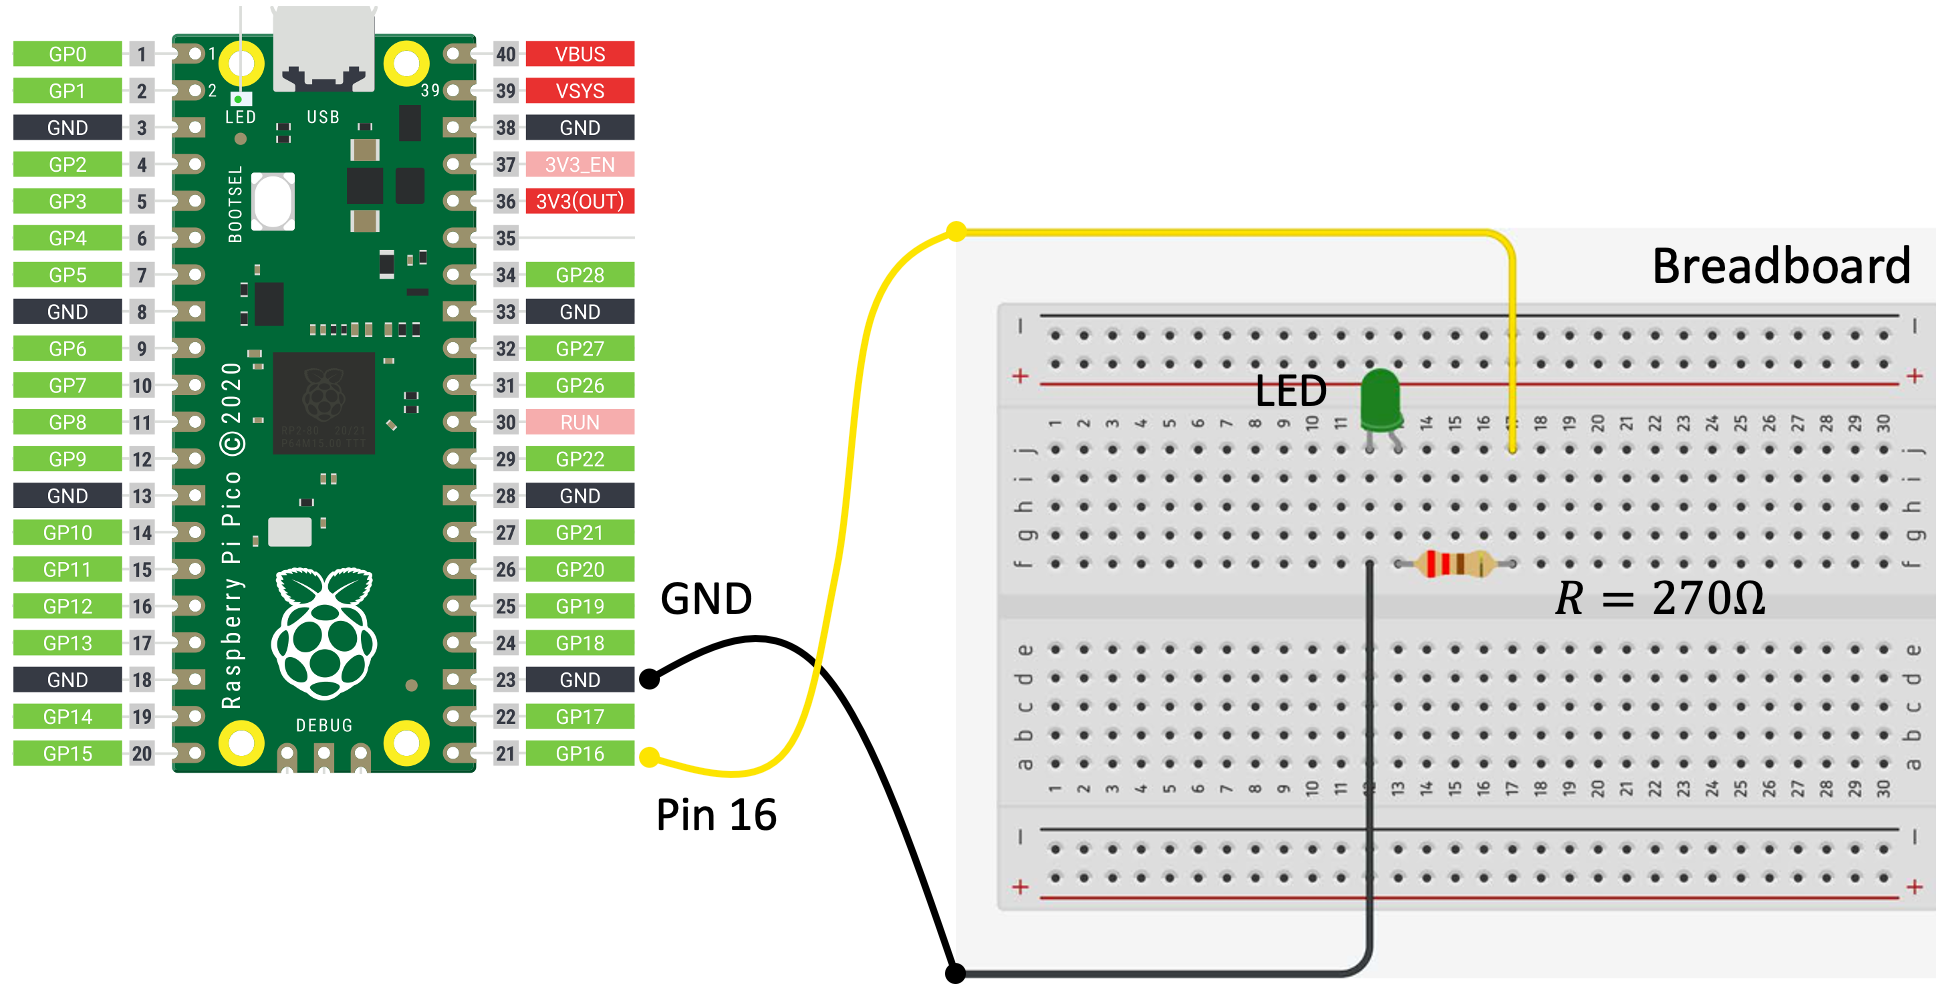
If the current becomes too large, the LED will be destroyed. To prevent this to happen, we will use a Resistor to limit the amount of current in the circuit. In the wiring diagram a resistor R = 270ohm is used, but you can use, e.g., R = 330ohm or similiar.
You can use a multimeter or the color codes on the resistor in order to find the resistance of the resistor. There exists also different "Resistor Calculators" on internet, e.g., like this one: https://www.allaboutcircuits.com/tools/resistor-color-code-calculator/
Blinking LED Example:
import machine
import time

pin = 16
led = machine.Pin(pin, machine.Pin.OUT)

while True:
    led.value(1)
    time.sleep(2)
    led.value(0)
    time.sleep(2)
In this example Pin 16 is used, but you can use any of the available GPIO pins. Here you see the Raspberry Pi Pico Pinout.
Here you will find a video showing the final result.
4. Pulse Width Modulation (PWM)
We've seen how to turn an LED on and off, but how do we control its brightness levels? An LED's brightness is determined by controlling the amount of current flowing through it. The Raspberry Pi Pico has no real/true Analog Input pins. A simple trick we can use is to flash the LED faster than the eye can see! By controlling the amount of time, the LED is on versus off, we can change its brightness. This is known as Pulse Width Modulation (PWM). Basically, PWM is a "trick" to generate variable voltages on digital pins.
Below we see an illustration of the Pulse Width Modulation (PWM) principle:

Basic PWM Example using MicroPython:
from machine import Pin, PWM
from time import sleep

pin = 16
pwm = PWM(Pin(pin))
pwm.freq(1000)

N = 65535
for brightness in range(N):
    pwm.duty_u16(brightness)
    sleep(0.0001)

pwm.duty_u16(0) #Turn LED of when finished
In this example the wiring is the same as the previous LED example.
The duty_u16() function acepts a value between 0 and 65535. Raspberry Pi Pico has 16bit resolution (2^16 = 65536 different levels), producing values from 0 to 65535. If value = 0 the LED is off.
Here you will find a video showing the final result.
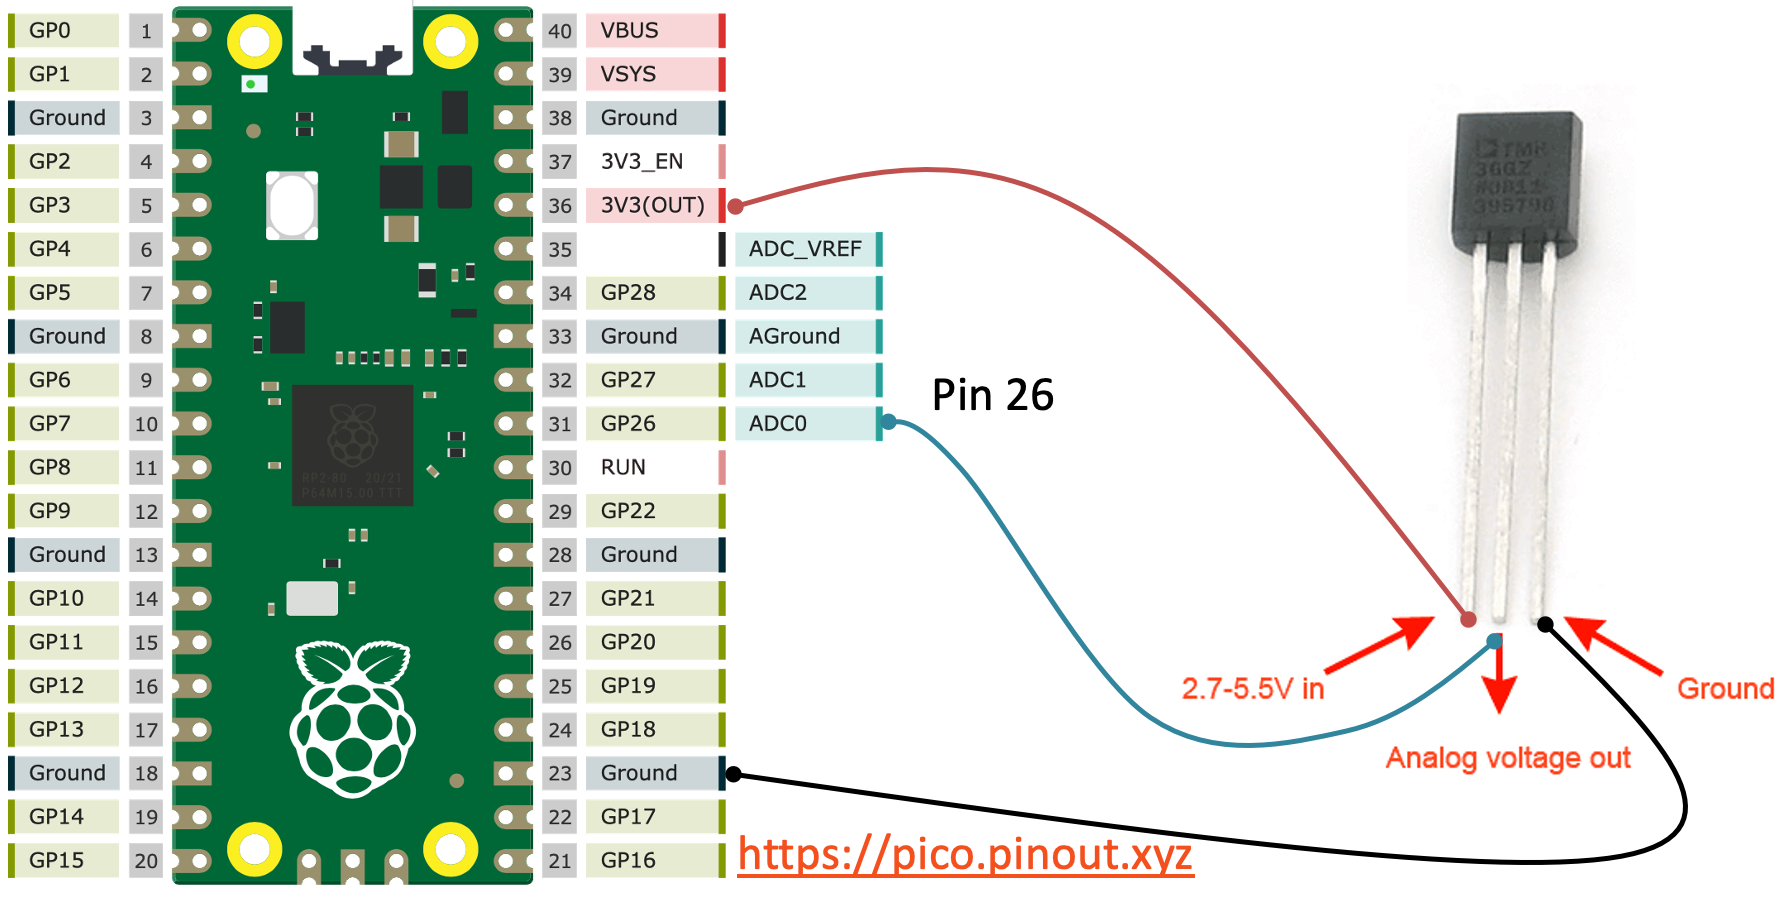
5. TMP36 Temperature Sensor
Here we will use a TMP36 Temperature Sensor that we wire on a Breadboard and connects to the Raspberry Pi Pico board.
Wiring Diagram:
Basic TMP36 Example using MicroPython:
from machine import ADC
from time import sleep

adcpin = 26
tmp36 = ADC(adcpin)

while True:
    adc_value = tmp36.read_u16()
    volt = (3.3/65535)*adc_value
    degC = (100*volt)-50
    print(round(degC, 1))
    sleep(5)
Raspberry Pi Pico has 3 Analog Input pins that we can use. Here you see the Raspberry Pi Pico Pinout.
ADC Value to Voltage Value:
The built-in Analog-to-Digital Converter (ADC) on Pico has a 16 bit resolution (2^16 = 65536 different levels), producing values from 0 to 65535. The read_u16() function gives a value between 0 and 65535. It must be converted to a Voltage Signal 0 - 3.3v.
Convert from Voltage (V) to degrees Celsius:
From the TMP36 Datasheet we have that:
(x1, y1) = (0.75V, 25°C)
(x2, y2) = (1V, 50°C)
There is a linear relationship between Voltage and degrees Celsius:
y = ax + b
We can find a and b using the following known formula:
y − y1 = [(y2 − y1)/(x2 − x1)] * (x−x1)
This gives the following equation y = 100x - 50
You can also improve the code quality by putting the conversion part into a separate function, etc. See Raspberry Pi Pico and TMP36 Temperature Sensor for more details and examples.
6 Running Raspberry Pi Pico without PC
If you want to run your Raspberry Pi Pico without it being attached to a computer, you can use an external USB Micro Power Supply (between 1.8V and 5.5V). To automatically run a MicroPython program, simply save it to the device with the name main.py. Save the main.py file on the Raspberry Pi. Unplug the connection to your PC, then attach the USB Micro Power Supply. Then the main.py should automatically run when the Pico is starting.
You can also click Ctrl + D in the Shell inside the Thonny Editor to force a soft reboot command. In both cases the "main.py" program should start to run automatically.
For more Raspberry Pi Pico Resources, Tutorials, Examples and Videos see the main Raspberry Pi Pico page.
Additional Resources
Below you will find more interesting and relevant resources
IoT
Internet of Things
Raspberry Pi
Raspberry Pi resouces